Aperture Priority – EASIER Than Manual Mode!
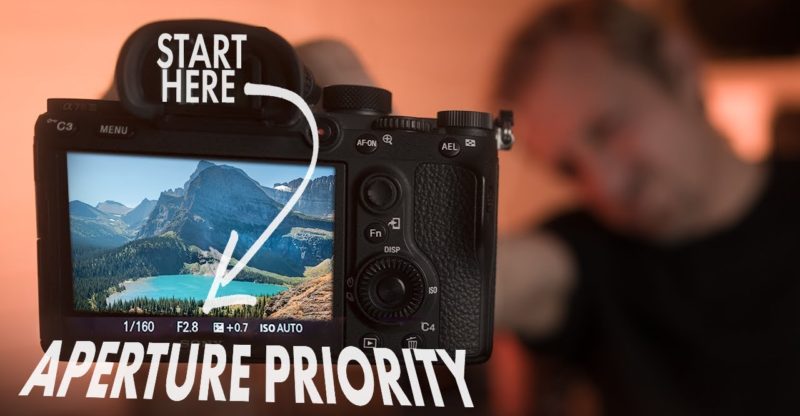
okay so maybe you're new to photography or you just got a new camera recently and you're interested in making the move to manual mode but you're not quite there yet I mean you understand the concept of aperture and shutter speed and ISO but you're just not confident enough to use it in the big moment and so you wind up reverting back to auto mode and then you wind up getting a photo like this when you are really trying for this or this when you wanted this and has this ever happened to you well I've got a bit of a secret that a lot of the pros use and they don't talk much about and not only is it gonna help you in the big moment but it's also gonna help you get more comfortable with manual mode quickly it's called aperture priority and I'm gonna show you how to use it today [Music] okay before we start another sincere thank you to all you new subscribers I'm super excited about the community we're building and I'm looking forward to hanging out together here and if you haven't subscribed already we do simple to understand photography and video tutorials insights and reviews so hit that subscribe button you won't be sorry so at this point you probably understand the basics of manual mode and the exposure triangle and how aperture and shutter speed and ISO work together but still using all three of those levers in a changing environment on the fly and trying to nail shots is not easy and that's where aperture priority comes in and your first question might be well how's aperture priority different than full auto or program mode what program mode is where you set the ISO and the camera decides the shutter speed and aperture for you aperture priority is where you set the aperture and then the camera decides the ISO and shutter speed for you but this can even be dialed in a little bit tighter and I'm gonna show you how and your second question might be okay then what situation is aperture priority good for and the answer is pretty easy unless you need to control your shutter speed for say sports or freezing action or maybe when you want to slow down action like in a waterfall or a river and you want to smooth out that water or say night photography where you need to keep your shutter open to capture the Milky Way well then you're probably gonna want to use shutter priority but pretty much everything else can be covered by aperture priority portraits fashion weddings events landscapes cityscapes and even street photography you can use aperture priority with confidence let me tell you how I use aperture priority and how I make sure that I have complete control over my settings no matter what the situation is and at the end I'll give you some tips to dye your exposure to even be more precise and get exactly what you see with your own eyes so your first steps pretty easy you're gonna want to set it in aperture priority and that's denoted by an A on Sony cameras and I believe on Nikon cameras and an A in Cannon and some other cameras just take a quick peek at your manual and you'll know exactly which letter to dial it to second if I'm doing landscapes or cityscapes or anything where my camera is on the tripod then I choose my aperture typically f/8 or f/11 as this is a deep enough depth of field to get everything in focus and usually the sweet spot for sharpness on lenses the next thing I do is I set my ISO to 100 which is the base ISO for the Sony a7 cameras as for landscapes it's ultra important to get the cleanest shot possible okay so the next step is I just frame my shot set my focus and take the photo see the camera decides what the shutter speed is gonna be depending on the light that's coming in and since my camera is on a tripod I don't really care what it is I know it's gonna be stable and I'm gonna have a sharp photo and that's basically it it's pretty simple in fact let's go outside and frame up a shot and I'll show you exactly how to do this and what I'm talking about okay so we're all set up we've got our camera on our tripod and our landscape ish scene and not the most beautiful in the world but it'll do for today and so our first step is to put the camera in aperture priority which we've done denoted by the a and then our next step is to set the ISO to 100 and we've done that we know we want to be in F 11 because we're doing a landscape and if we want to go down to f9 or f8 but I like f11 if it's possible and the cameras chosen a 1/4 second speed and you can see here that these lines are the zebras that are indicating that we may have a blowout in our highlights here so in order to check that we turn on our histogram and we'll just see make sure that it's not pushed so far right that it's off the edge of the graph here now the histogram is just showing us the darkest pixels on the left and the brightest pixels on the right in the image so you can see here that most of this image is dark and we've got some highlights down here but you can see that a lot of this is in the dark range or darker middle range and that's denoted by the pixels right here and I'll be doing a whole video on histograms pretty soon so stay tuned for that that's gonna be a good one okay so the other things that you might want to check are your white balance and make sure that the scene is being rendered in the same kind of color that you're seeing in front of you I would suggest if you're a beginner just leave your white balance on auto for now as the cameras are pretty good at detecting what the white balance should be as you get more experienced you're gonna want to dial in your white balance yourself because you may be doing composites or stacking images and you don't want that white balance to change and you really want to dial that in as closely as you can before you get back to your computer to start processing it makes it much easier when you're processing your image if you've already got that dialed in properly in camera so now we have our composition set and all we want to do is make sure that it looks good on the histogram and so as long as the histogram looks good which it doesn't look like we have any blown out pixels we just have a warning and you can see here we've got our little box that shows the focus point so we dialed it in right to the spot where we want it focused we make sure that's focus properly and we take a shot and then we just check the shot make sure that it looks good make sure that the focus is on and that which it looks like it is and we check the histogram make sure that there's no blowouts on the highlights and that looks pretty good and that's it it's as easy as that now if we did have blowouts on highlights what we can do and here's a little trick is you can use your compensation dial this is your exposure compensation and you can adjust this aperture priority just a little bit to your liking so if we felt it was a little bit blown out we would just dial this down and each click is one third of a stop and so if we dial down three stops that's one full stop of light and you can see that it's showing here exposure compensations minus one and now we're at 1/6 of a second if we do it more – – we're now 113th of a second and – 3 125th of a second you can see the image getting darker as we do that so if you're really concerned about blowouts you can adjust that way so we'll dial it down 1 and we'll take a photo see what it looks like and if you look at your histogram it's actually exposed a little bit – left for my liking and I would rather that be exposed to the right remember that these are JPEG renderings and so the histogram is going to be off the JPEG not off the raw file which the raw file will have a much much larger dynamic range than the JPEG file so you can push it a little bit further to the right and be sure that you're getting all of these details in the shadows and eliminate noise if you're trying to raise those shadows and make them brighter and post-processing so I would rather expose to the right and make sure that I've got those darks exposed properly okay so now your question might be that's great for landscapes what about portraits how can I use this for portraits and that's easy like we were talking about before you want to set your minimum shutter speed which is right here – 1 over 125th and then you want to make sure that your ISO is on auto so we've got auto ISO with a minimum shutter speed of 1 over 125th and that should eliminate all your camera shake if you're doing hand-held so let me put you down as we take this off the tripod so now if we drop our f-stop to say f4 which is more appropriate for portraits and you'll see your shutter speed change as we move around and direct it towards the sunlight but you'll also see that when you go to take your photo that ISO is going to change as well so you see the ISO is now 125 whereas if we move down here your ISO is now 1,000 because the image is dark enough that the amplification on your camera sensor needs to be higher so that ISO goes higher and as we move into real dark areas you'll notice that that ISO will really move up to compensate for that shutter speed so if you're at a party in a dark room or if you're at a graduation and in dark Hall that ISO is gonna compensate for your one over 125th shutter speed and that's it that's how it works okay we're back in the okay we're back in the studio a little bit of a recap here so the first thing you don't want to do is make sure your camera's setup properly before you go on your shoot and you can just tick through a few simple steps to make sure you do that first make sure your camera style is set to aperture priority and choose your aperture if you're doing landscapes it's gonna be f/8 or f/11 if you doing portraits or events it's gonna probably be 2.82 4.0 next choose your ISO if you're gonna do landscapes you know you're gonna be on a tripod and so your ISO can be a hundred if you're gonna be doing portraits or events then you know you're gonna want to use auto ISO with a minimum shutter speed of 160 third turn on your zebras to make sure you don't blow out your highlights then just choose your composition and use your compensation dial to be sure that you're exposed properly for landscapes you're gonna want to expose to the right and for portraits and events just be sure that you're exposed to what your eye sees then just take your photo check your sharpness in your histogram and adjust if you need to and that's it to make it super easy for you I made a PDF that you can download and put on your phone to refer to no matter where you are I'll leave a link in the description below and you can download one for you so tell me what stage of photography are you in and if you struggle with manual mode I know I sure did when I first started out and I still use aperture priority in certain situations it's super helpful leave a comment below and let me know also if you want to know more about ISO I recently did a video about native ISO that explains everything you need to and want to know about ISO no matter what camera you're on I'll leave a link in the description below and you can check that out I hope that this video helps and if you feel like it did please hit that like button is that really does help and don't forget to hit the subscribe button and that little notification bell to stay in the loop around here and I'll see you in the next video you [Music]


